CEGUI In Practice - Using .layout files
Written for CEGUI 0.7
Works with versions 0.7.x (obsolete)
CEGUI In Practice series
CEGUI InPractice 5
In this tutorial we will introduce how to use the .layout file. This is likely what will be used for larger scale projects, where the art team isn't going to want to wait for you to recompile the source for every change they make.
Meet the Layout
The Layout file (.layout) is an xml file. There exists at least two editors for layouts. The first one is the CEGUI LayoutEditor This is a fairly mature editor. Unfortunately it is deprecated and has not received any updates in sometime. There is a new Editor (CEGUI Layout Editor 2) which is available from the SVN. For the usage of this tutorial tho, we will not be using an editor and will be manipulating the .layout file with a plain old text editor.
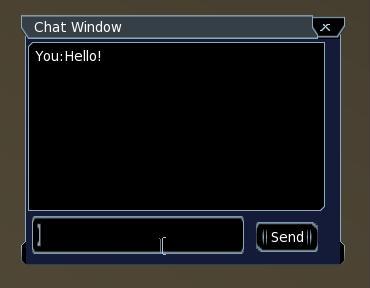
First thing to note, is its an XML file. So proper XML formatting is required. Second, is that it is hierarchical just like CEGUI. We will work towards writing a Simple Console here. I have created a console layout, and that will be the goal of this tutorial, to make a console editor like you would find in the various MMORPG's. This is what we'll make today:
<?xml version="1.0" encoding="UTF-8"?>
<GUILayout >
    <Window Type="TaharezLook/FrameWindow" Name="ConsoleRoot" >
        <Property Name="Text" Value="Chat Window" />
        <Property Name="TitlebarFont" Value="DejaVuSans-10" />
        <Property Name="TitlebarEnabled" Value="True" />
        <Property Name="UnifiedAreaRect" Value="{{0.114991,0},{0.358182,0},{0.519469,0},{0.775455,0}}" />
        <Window Type="TaharezLook/Editbox" Name="ConsoleRoot/EditBox" >
            <Property Name="MaxTextLength" Value="1073741823" />
            <Property Name="UnifiedAreaRect" Value="{{0.0201637,0},{0.787097,0},{0.694549,0},{0.957693,0}}" />
            <Property Name="TextParsingEnabled" Value="False" />
        </Window>
        <Window Type="TaharezLook/Button" Name="ConsoleRoot/SendButton" >
            <Property Name="Text" Value="Send" />
            <Property Name="UnifiedAreaRect" Value="{{0.732211,0},{0.812349,0},{0.928283,0},{0.946832,0}}" />
        </Window>
        <Window Type="TaharezLook/Listbox" Name="ConsoleRoot/ChatBox" >
            <Property Name="UnifiedAreaRect" Value="{{0.00534809,0},{0.0131038,0},{0.949636,0},{0.762443,0}}" />
        </Window>
    </Window>
</GUILayout>
Okay, i'll admit. I cheated and used a LayoutEditor for this. But i'm allowed to, I know what I'm doing otherwise, so do don't back talk me and do your homework.
Erm. Anyway, lets look at the setup of the .layout file.
the first line <xml..> Is just the XML Declaration, and is not important for us.
the next line <GUILayout > begins the .layout file as far as CEGUI is concerned.
Next up is:<Window Type="TaharezLook/FrameWindow" Name="ConsoleRoot" >This is where the meat begins. As you can see we're creating a window of type "TaharezLook/FrameWindow" with the name "ConsoleRoot" the next lines:
      <Property Name="Text" Value="Chat Window" />
        <Property Name="TitlebarFont" Value="DejaVuSans-10" />
        <Property Name="TitlebarEnabled" Value="True" />
        <Property Name="UnifiedAreaRect" Value="{{0.114991,0},{0.358182,0},{0.519469,0},{0.775455,0}}" />
Change various PropertySets on that new framewindow. It sets the font, Titlebar and the area. these could also be done in code by calling: <tabs> <tab title="C++">
CEGUI::Window::setProperty("TitlebarFont","DejaVuSans-10");
</tab> <tab title="Python">
PyCEGUI.Window.setProperty("TitlebarFont","DejaVuSans-10")
</tab> </tabs> So as you can see, the scripts can be very useful allowing us to change properties outside of the code. Giving the artists a great deal of usability!
Anyway, the next line is<Window Type="TaharezLook/Editbox" Name="ConsoleRoot/EditBox" > <Property Name="MaxTextLength" Value="1073741823" /> <Property Name="UnifiedAreaRect" Value="{{0.0201637,0},{0.787097,0},{0.694549,0},{0.957693,0}}" /> <Property Name="TextParsingEnabled" Value="False" /> </Window>
You'll notice this is before the </Window> of the ConsoleRoot, so it will be created as a child in of ConsoleRoot when the script is loaded in CEGUI. Can you tell what kind of window this will be? It will be an edit box. Thats the portion of the Console Window where the user will be able to type in what they want to say. I'm not going to go into detail about the rest of the windows, as they are pretty similar to the above examples. But "ConsoleRoot/SendButton" will be the send button, and "ConsoleRoot/ChatBox" will be where the chat messages will display to.
[Note: As you can see I adopted the Naming scheme of Parent/Child window names. This is NOT required, but I think it helps make things easier to read on code side while debugging. You wouldn't want to just name it EditBox as that would be a pretty Common name, and may conflict with other windows you create later on in the application.]
Applying our knowledge
Now that we have gotten an introduction to the .layout file, we should learn how to implement this knowledge. How to get the layout file to show up in CEGUI.
This code will load the layout into a new window:
<tabs> <tab title="C++">
CEGUI::Window *newWindow = CEGUI::WindowManager::getSingleton().loadWindowLayout("MyConsole.layout");
</tab> <tab title="Python">
newWindow = PyCEGUI.WindowManager.getSingleton().loadWindowLayout("MyConsole.layout")
</tab> </tabs>
Pretty self explanatory. There is something to note tho, you can add a prefix to the names in this .layout file. This would be useful if you're going to add the same .layout multiple times, because after the first load you'd get name conflicts. It would find a previous "ConsoleRoot" for example. So by calling this
<tabs> <tab title="C++">
CEGUI::Window *newWindow = CEGUI::WindowManager::getSingleton().loadWindowLayout("MyConsole.layout","second_");
</tab> <tab title="Python">
newWindow = PyCEGUI.WindowManager.getSingleton().loadWindowLayout("MyConsole.layout","second_")
</tab> </tabs> It would append "second_" to the window names (ie. "second_ConsoleRoot"); This will prevent naming errors.
Now if we ran this right now would we be able to see the window?
Nope. We haven't attached it to the window hierarchy have we?
<tabs> <tab title="C++">
CEGUI::System::getSingleton().getGUISheet()->addChildWindow(newWindow);
</tab> <tab title="Python">
PyCEGUI.system.getSingleton().getGuiSheet().addChildWindow(newWindow)
</tab> </tabs> Note: This assumes that you have a GUISheet already set, otherwise this will result in a segfault!
Conclusion
Well we showed how to load a .layout file. Sofar now we know how to Start the system with Ogre, create a window and understand properties, add input, process events, and load layouts. In the next tutorial we will apply this knowledge to create a console which actually does something! Till next time.
This list of the Window properties may be helpful in creating your .layout files: Properties
